Welcome


Welcome to The Gingerbread Bunny! I'm Sarah, a textile artist specialising in crochet and felt based in Wigan in the North-West of England.

On my blog, you can find my day-to-day craft adventures and tutorials.

You can find details of my work for sale and workshops on my website - www.thegingerbreadbunny.co.uk

Wednesday, 10 August 2011

All buttoned up!

I hope everyone is well and that you have all been getting up to lots of crafting!  I am writing this whilst eating some scrumptious homemade shortbread (The recipe is Lorraine Pascale's Dreamlike Shortbread from the Baking Made Easy programme and it is scrumptious!)

Recently, I read a great post by Martine of iMake all about buttons. She had been making buttons with shrink plastic and Fimo (oven bake clay) and if you are interested in buttons then check out her posts Button Love, First Attempt at Fimo Buttons, Making Buttons and The Gift of Buttons

I loved the idea of making my own buttons and managed to get some Sculpey (another make of oven bake clay) from a local craft store and so set about to make some buttons and some beads.  Here is how I did it!

I began by rolling out the clay using a typical kitchen rolling pin.  I discovered that it is important not to roll it to thinly as it becomes bendy when baked.  Thicker is better!

Don't roll it too thin!

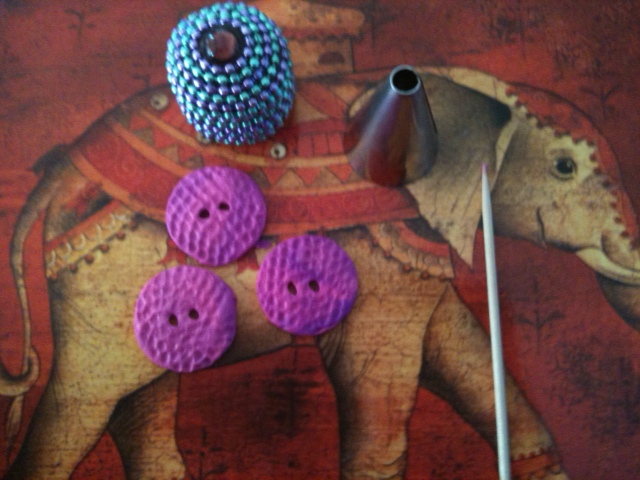
I didn't have any special clay cutters and raided the kitchen drawers for suitable shaped and sized implements for cutting out my buttons.  I used a icing pipe to make circular buttons, the top off a cocktail stick box to make my square buttons and cookie cutters I had in to cut out star and bunny shapes!  I made the beads by rolling into shape and then sticking a cocktail stick through the middle for the whole.  I had lots of fun experimenting with my implements to create texture on the buttons to.


I also experimented with mixing the 2 colours together.  You can get some great swirly effects.


I then baked the buttons and beads in the oven for around 30 minutes.  I used a baking tray covered with baking paper as I was worried they may stick, although now I'm pretty sure they wouldn't have done.  Once they where firm I left them to cool and there you have it!  Gorgeous buttons and beads to adorn my future makes.


If you fancy having a go at making your own buttons and beads, oven bake clay is a really easy and cheap way to do it and lots of fun!


Wednesday, 3 August 2011

Frog it!

Rip it, Rip it, Rip it!  That is the sound my crochet makes as I frog back, or rip out, all the lovely work done on my Esmee Cardigan!  In fact, the phrase 'frog it', as used extensivley by knitters and crocheters, has come from rip it sounding so much like ribbit, the noise associated with those lovely green amphibians, frogs!

I have decided to stretch my crocheting skills to the next level and make a full blown cardigan.  I have been admiring this paticular one, Esmee by Sarah Francis, in the issue 13 of Inside Crochet magazine for some time.  What has been putting me off was the ADVANCED difficulty rating: EEEEK!  Am I ready for an advanced difficulty rated pattern?  Can I do it after only 6 months on the hook?  I am never one to turn down a challenge and, after coming across some gorgeous teal King Cole yarn with a pretty sparkly thread running through it in a craft store, I knew that it had to be done.


See how pretty it is?  I just couldn't resist!

Now then, was it not enough for me to be attempting an advanced diffculty pattern?  Did I not feel that this was challenge enough?  Of course not!  I had to choose a yarn that is considerably thicker than the one used in the pattern.  Now then, some people would do a guage swatch.  Ha!  Not me, of course I do not need to waste my time on something so silly as a guage swatch - how silly I was! 

So far I have started and frogged the cardigan 4 times!  Given that it is a foundation chain of 233 stitches that is an awful lot of crochet to frog.  I am now beginning to understand the need for a guage swatch, if not to get my crochet right first time, but to preserve my own (and my husbands) sanity.

There is a happy ending to this story though!  I have learnt 3 things from my frogging experiences:

1.   After all of the attempts, the pattern is pretty much ingrained in my brain and could probably be completed from memory.
2.  I have learnt that guage swatching is not a waste of time and is suggested for a reason. 
3.  When substituting yarns, pick one the same weight.

I will not, however, be defeated by this cardigan and, if it takes me until Christmas, it will be done!

Monday, 1 August 2011

I love mitts!

I love ....


It seems like ages ago since I last sat down to type a blog post!  I have been away for a long weekend in Boscombe near Bournemouth (about 300 miles away!) for a Tribal bellydance Teacher Training Course which has just been awesome.  I highly recommend Boscombe if you love vintage clothes and accessories!  The beautiful heart picture above was what came on top of my scrummy mocha in an amazing coffee shop called Boscanova in Boscombe (where they also have a weekly Knit and Natter)

Anyway, I am in love; with fingerless mitts!  My 'away' crochet project this weekend has been the Penny Farthing fingerless mitts by Aoibhe Ni from her Gloves to Love pattern book (which is available to download from Ravelry for a very reasonable price.) 

Now then, before I share the pics of the completed crochet, I want to gush over the beautiful patterns in the book because they are amazing. I am a big fan of Aoibhe's crochet patterns as they are so modern and beautiful and her patterns are regularly featured in Inside Crochet magazine.  The glove patterns are just beautiful and I want to make every single pair.  There are short mitts, long mitts, thick Aran weight mitts, 4 ply mitts, fancy patterns, plain.  I want them all!  It is pretty likely that is I know you, you will be getting some fingerless mitts for Christmas.

So, here are my mitts in their finished crocheting stage.  They still need seaming at the side and some ribbon and buttons adding (keep an eye on Facebook and Twitter for completed pictures).

Penny Feather Mitts

Sunday, 24 July 2011

Getting organised and the Summer Crafty Challenge!

I am not the tidiest person in the world, infact, Mr Gingerbread Bunny is frequently complaining about the magazines I've left on the coffee table, the wool on the couch and the clothes I leave all over the floor!  My craft half-a-room had also gotten a little bit untidy of late and needed a good sort out and reorganising so, that is what I set to do today!

I store my crafty bits and pieces in various boxes and baskets and everything does have its place (when I put it away!)  My fabric is organised by size into crates and my wool is in a plastic box with a lid (so the moths don't get at it).  There isn't a vast amount of space for things so I have to make good use of what I have, space under the table, on the windowsill and on the tiny shelfy box thing against the wall. 


Tidy room!
I also have lots of crafty books and ideas taken from magazines.  The books live on the bookcase in my bedroom whilst all the clippings I put into various folders and notebooks according to their craft.  I have acquired many of these and hadn't gotten round to sorting them out so I did this today - it took ages!


Hopefully, I will maintain the very tidy state of my craft half-a-room for quiet some time!

Now, being a teacher, it is the summer holidays so I have set myself a Summer Crafty Challenge!  Each day I am going to do something crafty or craft related.  I had initially been too ambitious and aimed to complete a crafty project so am now being more realisitic!  I am posting my crafty activities each day on my Facebook page and on my new Twitter account as gingerbreadbun!  If you would like to join me in the challenge, which lasts until the 1st September, that would be amazing!

I would love to hear about your organisation tips and your crafty projects!